Stream Processing with Kafka and Flink
Flink and Kafka have both been around for a while now. They continue to gain steam in the community and for good reason. They provide battle tested frameworks for streaming data and processing it in real time.
I’m working on a few projects to properly leverage stream processing within our systems. We have a lot of streaming data, however most of those streams are not processed in real time. There is a ton of potential power in real time processing that we currently aren’t tapping into. A lot of our systems still rely heavily on batch processing. I think there will always be a place for processing data in batch, but for some workflows, near real time processing is required. For example, if you are working on something like fraud detection, you need to know what is happing as fast as possible. Processing data hours later to detect fraud that has already happened isn’t usually that helpful.
I think we are finally ready to take on these challenges and really put some effort into building out our stream processing platform.
Since I was fairly new to building stream processing pipelines, I decided it would be helpful to build a basic streaming example project for understanding and reference on the systems involved. Hopefully, this post and the code that goes with it, will also help anyone else getting started with Flink processing.
All the code and examples here are for educational purpose and aren’t meant for any production use cases.
At the end of this post we’ll have used docker to spin up Kafka, Zookeeper, and Flink in separate containers. Using those containers, we’ll produce open Wikipedia data to a Kafka topic, process that data within a Flink job, then write that processed data back to another Kafka topic. This should help us get a better idea of how these systems work together and hopefully allow us to become more comfortable developing streaming pipelines.
Here are the main tools/frameworks we will be using in this post:
I won’t be diving deep into any of these so feel free to check out the links above if you’re not familiar. I’ll be using them in combination to try and understand their interactions with each other better. And more specifically, how Kafka and Flink work together. Zookeeper is needed by Kafka to handle distributed consensus, and Docker is the vehicle we will use to run all these things inside of.
Here is a quick diagram of the pipeline we will be working towards building:
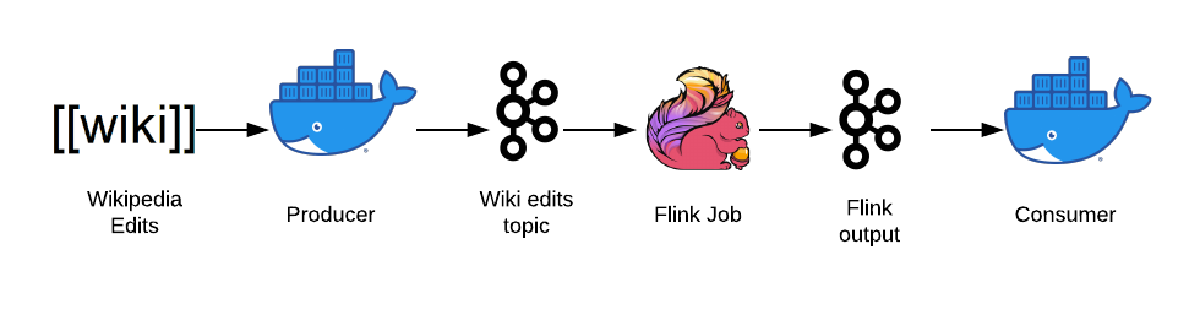
This is a fairly straight forward streaming pipeline so it should be a good starting point for us.
The first step is getting our Docker container built.
The code for this post lives in this GitHub
repo. All of the commands run in this
post assumes that they are run from the foundations/kafka-flink-streaming
directory. If you’re following along you can clone the repo and cd to this
project directory:
git clone https://github.com/dan-sf/foundations.git && cd foundations/kafka-flink-streaming
Once in this directory we can run the following to build our base container for all our applications:
docker build . -t kafka-flink-streaming-fd
This will build a Docker image locally. Here is the code we use to generate this container:
FROM ubuntu:bionic

RUN set -ex \
    && apt-get update -yq \
    && apt-get upgrade -yq \
    && apt-get install -yq openjdk-8-jdk \
    && apt-get install -yq build-essential \
    && apt-get install -yq vim \
    && apt-get install -yq git \
    && apt-get install -yq wget \
    && apt-get install -yq curl \
    && apt-get install -yq netcat \
    && apt-get install -yq maven \
    && apt-get install -yq sudo

RUN mkdir /tmp/downloads
WORKDIR /tmp/downloads

# Download keys and asc files for verification
RUN wget -q https://archive.apache.org/dist/zookeeper/KEYS \
    && mv KEYS zookeeper_KEYS \
    && wget -q https://archive.apache.org/dist/kafka/KEYS \
    && mv KEYS kafka_KEYS \
    && wget -q https://archive.apache.org/dist/flink/KEYS \
    && mv KEYS flink_KEYS

RUN wget -q https://archive.apache.org/dist/zookeeper/zookeeper-3.5.6/apache-zookeeper-3.5.6-bin.tar.gz.asc \
    https://archive.apache.org/dist/kafka/2.4.0/kafka_2.13-2.4.0.tgz.asc \
    https://archive.apache.org/dist/flink/flink-1.9.2/flink-1.9.2-bin-scala_2.12.tgz.asc

# Download resources. To speed up the docker build, we could use Apache mirrors
# that are closer. Currently we just download straight from Apache
RUN wget -q https://archive.apache.org/dist/zookeeper/zookeeper-3.5.6/apache-zookeeper-3.5.6-bin.tar.gz \
    https://archive.apache.org/dist/kafka/2.4.0/kafka_2.13-2.4.0.tgz \
    https://archive.apache.org/dist/flink/flink-1.9.2/flink-1.9.2-bin-scala_2.12.tgz

# Verify downloads
RUN gpg --import zookeeper_KEYS \
    && gpg --verify apache-zookeeper-3.5.6-bin.tar.gz.asc apache-zookeeper-3.5.6-bin.tar.gz \
    && gpg --import kafka_KEYS \
    && gpg --verify kafka_2.13-2.4.0.tgz.asc kafka_2.13-2.4.0.tgz \
    && gpg --import flink_KEYS \
    && gpg --verify flink-1.9.2-bin-scala_2.12.tgz.asc flink-1.9.2-bin-scala_2.12.tgz

# Decompress and mv source files
RUN tar -xf apache-zookeeper-3.5.6-bin.tar.gz \
    && tar -xf kafka_2.13-2.4.0.tgz \
    && tar -xf flink-1.9.2-bin-scala_2.12.tgz

RUN mv apache-zookeeper-3.5.6-bin /opt/zookeeper
RUN mv kafka_2.13-2.4.0 /opt/kafka/
RUN mv flink-1.9.2 /opt/flink/

# Setup conf files
WORKDIR /opt/
COPY zoo.cfg zookeeper/conf/
COPY flink-conf.yaml flink/conf/
RUN sed -i 's/zookeeper.connect=localhost:2181/zookeeper.connect=zookeeper:2181/' kafka/config/server.properties

# Copy source
COPY create_topics.sh kafka/
COPY editsize flink/jobs/editsize

EXPOSE 2181 9092 8081
RUN rm -r /tmp/downloads
You’ll notice we download the various packages we’ll need directly from Apache. Normally you’d want to use mirror sites which are closer to you for faster downloads. You can then get all the verification files from Apache and verify the files you downloaded from the mirror.
We also just install everything that we will need into one large Docker container. Normally you’d want to have different containers for each application so you can keep the containers smaller and more light weight. Here we are just keeping it simple and using one big container for all of our needs.
Now that we have a base container we can start spinning up our services. This
can be done easily via docker-compose:
version: "3"
services:
    zookeeper:
        image: kafka-flink-streaming-fd
        working_dir: /opt/zookeeper
        command: "bin/zkServer.sh start-foreground"
        ports:
            - "2181:2181"
    kafka:
        image: kafka-flink-streaming-fd
        working_dir: /opt/kafka
        command: bash -c "while ! nc -z zookeeper 2181; do sleep 0.2; done && bin/kafka-server-start.sh /opt/kafka/config/server.properties"
        ports:
            - "9092:9092"
        depends_on:
            - zookeeper
    jobmanager:
        image: kafka-flink-streaming-fd
        working_dir: /opt/flink
        command: bash -c "while ! nc -z kafka 9092; do sleep 0.2; done && bin/jobmanager.sh start-foreground"
        ports:
            - "8081:8081"
        depends_on:
            - kafka
    taskmanager:
        image: kafka-flink-streaming-fd
        working_dir: /opt/flink
        command: bash -c "while ! nc -z kafka 9092; do sleep 0.2; done && bin/taskmanager.sh start-foreground"
        depends_on:
            - jobmanager
    # Create the Kafka topics
    create_topics:
        image: kafka-flink-streaming-fd
        working_dir: /opt/kafka
        command: /opt/kafka/create_topics.sh
        depends_on:
            - kafka
In this compose file we create all the containers we will need to run our application. You’ll see a few areas of the code with something like the following:
while ! nc -z kafka 9092; do sleep 0.2; done && ...
This is to wait for the service, in this case Kafka, to be fully ready before we start our process. I noticed there are instances when docker thinks the service is ready but if you try to access it, you might get availability errors. This code is just a way to avoid those issues. There are probably better ways to handle this but should be okay for our use case.
I also run a standalone container to create the Kafka topics we will be using in
our pipeline. This compose service is named create_topics and runs the
following code:
# Create topic for sending wikipedia edits through
bin/kafka-topics.sh --create --zookeeper zookeeper:2181 \
--replication-factor 1 --partitions 1 --topic wikiedits

# Create topic for sending wikipedia edits through
bin/kafka-topics.sh --create --zookeeper zookeeper:2181 \
--replication-factor 1 --partitions 1 --topic average_edits_mb
Which will create our topics and then exit.
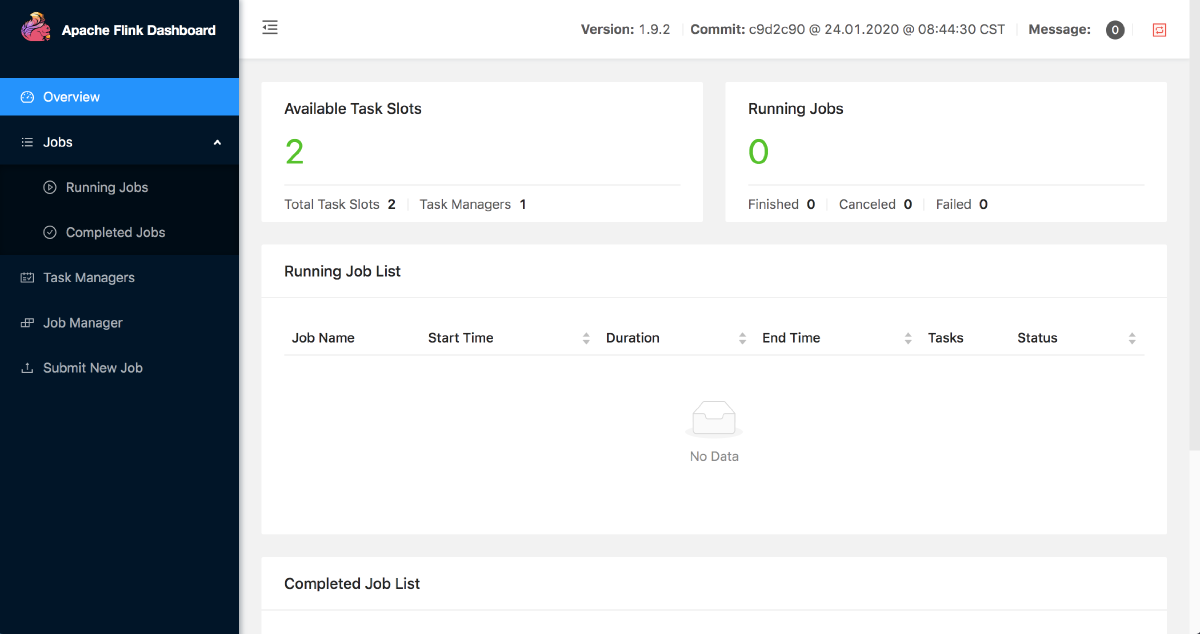
You’ll also notice we need to spin up job manager and task manager containers
for our Flink cluster. This should be enough for our purposes of running a
simple streaming job locally. You should now be able to check out the Flink UI
locally at localhost:8081 which will look like this:
We are now finally ready to write our Flink job, compile it, and submit it to our Flink cluster.
Our Flink application will be reading Wikipedia edit data flowing through one of the Kafka topics that we just created. Its great Wikipedia provides this data for anyone to play with and is a prefect way for us to get more comfortable with stream processing. You can find more about the data source here and take a look at the expected schema here. For records that give the “new” and “old” article sizes (in MB) we will be calculating the average edit size (absolute difference) over a tumbling 10 second window. For those new to Flink, windowing can be a little confusing, I’d recommend looking at the Flink blog post which introduces how windows work within Flink.
The main class for this application looks like this:
public class AverageEditSize  {
  public static void main(String[] args) throws Exception {
    // Set Kafka bootstrap server location
    Properties properties = new Properties();
    properties.setProperty("bootstrap.servers", "kafka:9092");

    // Get execution environment
    final StreamExecutionEnvironment env = StreamExecutionEnvironment.getExecutionEnvironment();

    // Set up the Kafka consumer reading json as input
    FlinkKafkaConsumer<ObjectNode> wikieditsKafkaTopic
        = new FlinkKafkaConsumer<>("wikiedits", new JsonNodeDeserializationSchema(), properties);
    wikieditsKafkaTopic.setStartFromLatest();

    // Set the Kafka source as input to our DataStream
    DataStream<ObjectNode> wikiedits = env.addSource(wikieditsKafkaTopic);

    // Here is where the real processing happens. We read from the source
    // topic, pull out the "revision" information (map). Remove nulls from
    // the stream (filter). Get the abs difference in the new/old edits in
    // bytes (map). Set the key by information and specify our window.
    // Provide custom aggregate function to generate averages of the change
    // in edits. We output the final data as average edit size in MB over
    // the given window
    SingleOutputStreamOperator<Tuple2<String, Double>> averageEdits = wikiedits
      .map(edit -> edit.get("revision"))
      .filter(reversion -> reversion != null)
      .filter(reversion -> reversion.get("new") != null && reversion.get("old") != null)
      .map(new MapFunction<JsonNode, Tuple2<String, Long>>() {
        @Override
        public Tuple2<String, Long> map(JsonNode input) throws Exception {
          JsonNode newBytes = input.get("new");
          JsonNode oldBytes = input.get("old");
          return new Tuple2<>("abs_edit_difference", Math.abs(newBytes.asLong() - oldBytes.asLong()));
        }
      })
      .returns(TypeInformation.of(new TypeHint<Tuple2<String, Long>>() {}))
      .keyBy(0)
      // Use a tumbling 10 second window, we could have done a countWindow
      // which would've only processed 10 records at a time which was useful
      // for verification of the aggregations
      .timeWindow(Time.seconds(10))
      .aggregate(new Average());

    // Create a producer for the output average_edits_mb topic
    FlinkKafkaProducer<String> averageEditsTopic = new FlinkKafkaProducer<String>(
        "kafka:9092",
        "average_edits_mb",
        new SimpleStringSchema());

    // Output string records in json format
    SingleOutputStreamOperator<String> averageEditsJson = averageEdits
        .map(average -> String.format("{\"%s\": %.2f}", average.getField(0), average.getField(1)))
        .returns(TypeInformation.of(new TypeHint<String>() {}));

    // Add the Kafka output topic as our sink
    averageEditsJson.addSink(averageEditsTopic);

    // Execute the Flink job
    env.execute();
  }
}
I’ve left out imports here but the full source can be accessed here.
The high level flow of this application is that we setup our job’s properties, create an execution environment (this is what we’ll use to actually run the job), set up our source (the “wikiedits” topic), process the incoming data, set up our sink (our output topic), and finally tell Flink to execute the job.
The observant reader will notice that I am using a class called Average to
help us do our averaging. This is a custom class implemented here:
// The accumulator class, which holds the state of the in-flight aggregates
class AverageAccumulator {
  public Long count;
  public Long sum;
  public AverageAccumulator() {
    count = 0L;
    sum = 0L;
  }
}

// Implementation of an aggregation function for averages
public class Average implements AggregateFunction<Tuple2<String, Long>, AverageAccumulator, Tuple2<String, Double>> {

  public AverageAccumulator createAccumulator() {
    return new AverageAccumulator();
  }

  public AverageAccumulator merge(AverageAccumulator a, AverageAccumulator b) {
    a.count += b.count;
    a.sum += b.sum;
    return a;
  }

  public AverageAccumulator add(Tuple2<String, Long> value, AverageAccumulator acc) {
    acc.sum += (Long) value.getField(1);
    acc.count++;
    return acc;
  }

  public Tuple2<String, Double> getResult(AverageAccumulator acc) {
    if (acc.count == 0) {
      return new Tuple2<String, Double>("average_edit_size_mb", 0.0);
    }
    // Since we get bytes from the input data we divide by 1M to get output MB
    return new Tuple2<String, Double>("average_edit_size_mb", acc.sum / (double) acc.count / 1000000);
  }
}
Flink provides an AggregateFunction interface that we can use to do any custom aggregations on our input data. Here I am just doing a simple average, but this can be as simple or complex as your use case dictates.
Now that we have our Flink application code together, we should be able to compile the code and submit the job to be executed. We can do this within a docker container using the image we already created.
docker run --rm --network kafka-flink-streaming_default -v ${repo_root}/_m2_cache:/opt/flink/jobs/editsize/_m2_cache kafka-flink-streaming-fd bash -c \
    "cd /opt/flink/jobs/editsize && \
    mvn -Dmaven.repo.local=_m2_cache package && \
    ../../bin/flink run -d -m jobmanager:8081
    target/editsize-1.0-SNAPSHOT.jar"
This code compiles our Flink application within a container and runs it in our
Flink cluster. You’ll notice that we use a _m2_cache local directory in the
docker run command. This will help us cache the maven dependencies so that if we
want to recompile we don’t need to pull the full dependencies every time.
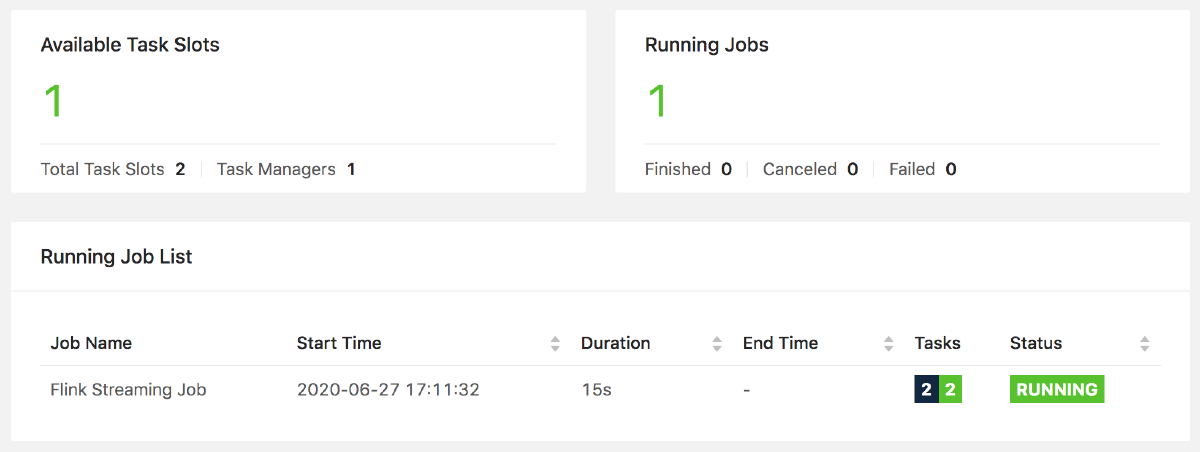
You should now be able to verify that your job is running from the Flink UI. Which should look something like this:
Now that our Flink job is running we can start producing real time edit data from Wikipedia:
docker run -it --rm --network kafka-flink-streaming_default kafka-flink-streaming-fd bash -c \
    "curl -s https://stream.wikimedia.org/v2/stream/recentchange \
    | grep data | sed 's/^data: //g' \
    | /opt/kafka/bin/kafka-console-producer.sh --broker-list kafka:9092 --topic wikiedits"
This will just run a container that reads edit data from Wikipedia and outputs
it to our wikiedits topic. You’ll want to run this in a new terminal window
since the process runs in the foreground. So we won’t be able to use that
terminal window unless we kill the process with Ctrl-C. Alternatively, you could
update the code to run in the background.
We can now watch the data processed in real time by consuming from the Kafka topics we already setup:
# Read input data from Wikipedia
docker run -it --rm --network kafka-flink-streaming_default kafka-flink-streaming-fd bash -c \
    "/opt/kafka/bin/kafka-console-consumer.sh --bootstrap-server kafka:9092 --topic wikiedits"
# Read the processed data from our Flink job
docker run -it --rm --network kafka-flink-streaming_default kafka-flink-streaming-fd bash -c \
    "/opt/kafka/bin/kafka-console-consumer.sh --bootstrap-server kafka:9092 --topic average_edits_mb"
The above commands can be run to verify our application is behaving as expected. Don’t forget to use Ctrl-C in the terminal to stop consuming from the Kafka topics.
Once you are ready everything can be shut down using docker-compose:
docker-compose down
Be sure to shut down any other containers that have been started. You can verify
everything has been stopped by running docker ps and checking there aren’t any
other active containers.
This was a really fun project and I learned a lot about how Flink and Kafka work together. These frameworks are very deep, and there is much more to learn from both of them. I was surprised by how straight forward it was to get these distributed systems to work with each other. There are a lot of great tutorials and documentation for both of these systems which really helped speed things up.
This example pipeline is not even close to running these systems within a production environment but I hope it helps provide a starting point for anyone else diving into the wonders of stream processing. Happy coding.