Pascal's Triangle With Luigi
For those of you who don’t know, Luigi is an open source framework developed by the people over at Spotify. It is a really powerful Python package used to create complex data pipelines. It’s true power and flexibility comes from the fact that it is written in Python and constructs it’s data pipelines using Python classes. So if you are already familiar with Python, Luigi should be fairly easy to get started with.
Luigi also comes with a ton of built in functionality and support for various data technologies. It has built in support for Hadoop, FTP, RedShift, SalesForce, Redis, … the list goes on. Most of the buzz-worthy data tools are included but, if there is something missing you can always implement that on your own by extending Luigi itself (got to love open source software). For more information about Luigi check out their official documentation here. There you will also find a complete list of all the data technologies that it supports.
Since I have been working with Luigi quite a bit lately, I decided that I wanted to put together an example project that would showcase some of Luigi’s basic functionality.
The most basic building block of a Luigi data pipeline are the Tasks. Tasks are Python classes that inherit from the luigi.Task base class. For example, here is a trivial Luigi task class:
class DataTask(luigi.Task):
    def output(self):
        return luigi.LocalTarget('/path/to/file.gz')

    def requires(self):
        return luigi.LocalTarget('/path/to/another/file.gz')

    def run(self):
        with self.output().open('w') as f:
            f.write('Data output.\n')
In this task I am implementing three functions output(), requires(), and
run(). You might be able to guess what each of these do. output() will tell
the task where to put the data you are outputting in that task, requires()
tells the task what other tasks need to finish before it can run, and run()
is what is executed when the task is processed. Using this basic starting point
you can create fairly complex data pipelines and dependancies.
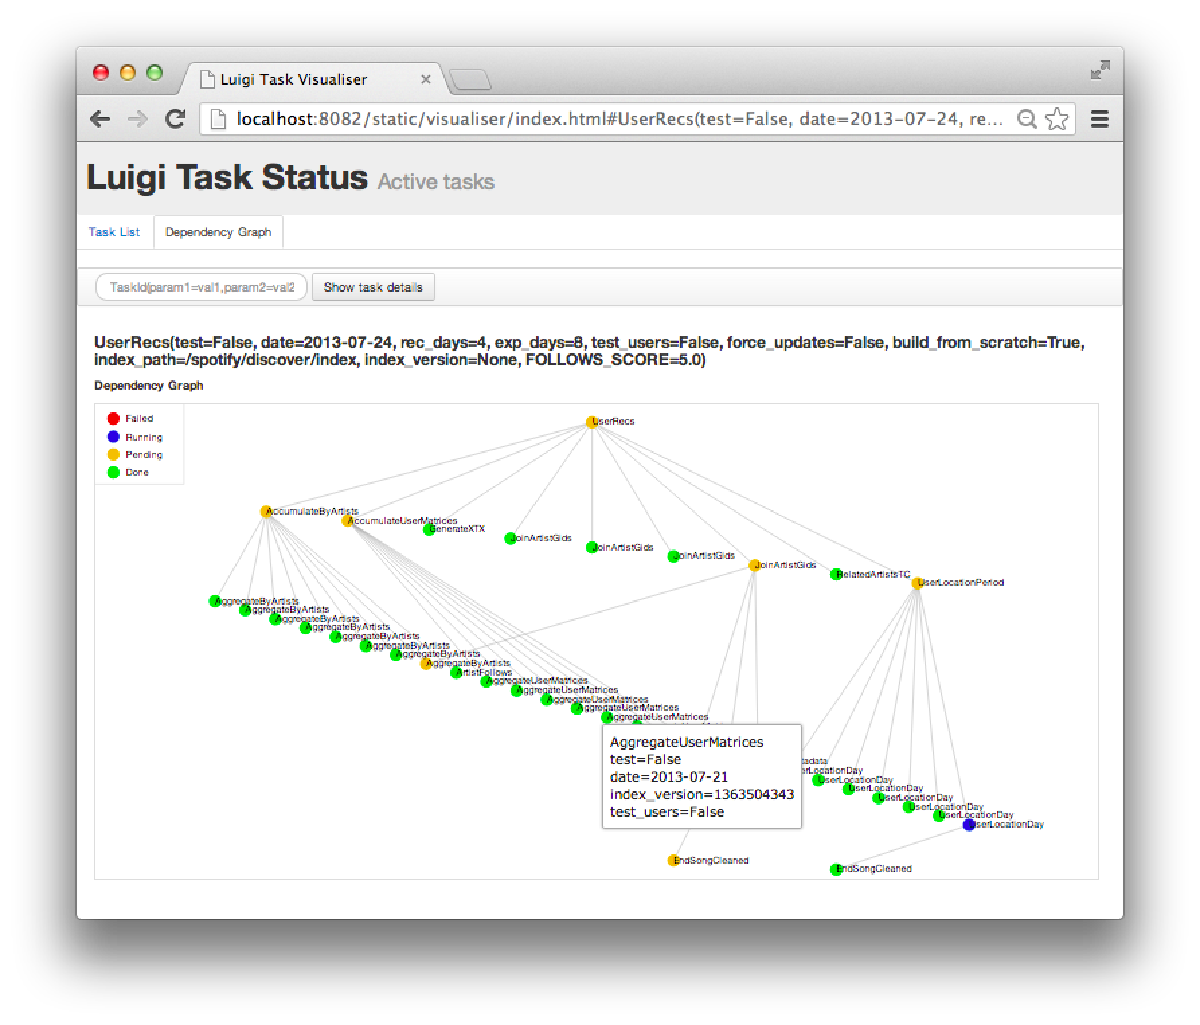
Luigi also uses an optional centralized scheduler that will allow you to view the dependency graph that your pipeline creates:
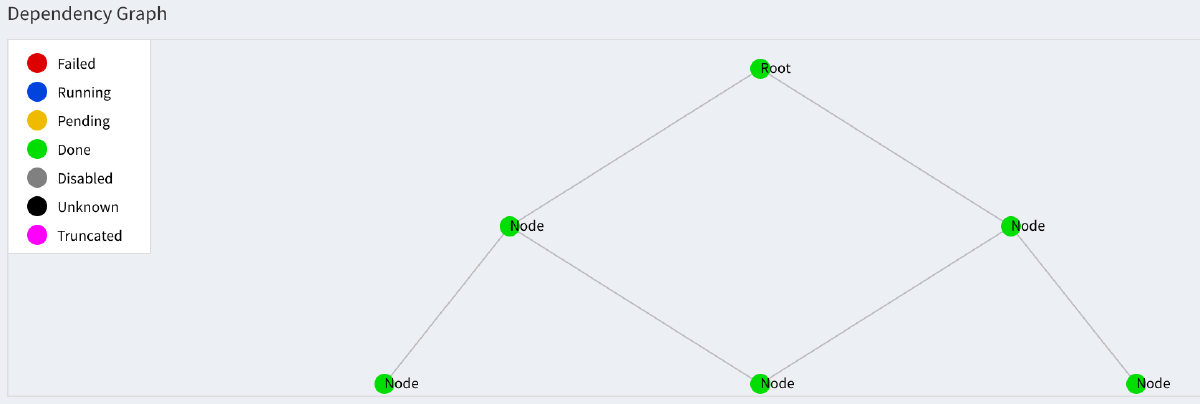
For this particular example project I wanted to create a dependency tree that looks something like Pascal’s Triangle. I also wanted to create options that will allow the user to specify how large the tree is, where the output is directed to, and how long the data processing will take. Since this is a basic example, I only use text files for output targets and dependencies but that could easily be extended to SQL or Hadoop or any other processing/loading that your data needs require.
I also wanted to set this project up as close to a true Python package as possible by using Python’s setuptools for installation and unit testing. Here is the project directory structure that I used for this project:
luigi_tree/
├── MANIFEST.in
├── README.rst
├── setup.py
├── src
│   └── luigi_tree
│   ├── __init__.py
│   ├── cli.py
│   ├── luigi_tasks.py
└── test
├── __init__.py
├── cli_tests.py
├── luigi_tasks_tests.py
And here is my setup.py:
from setuptools import setup

setup(name='luigi_tree',
      description='Create Pascal\'s triangle like trees in Luigi.',
      version='0.1',
      package_dir={'':'src'},
      packages=['luigi_tree'],
      test_suite='test',
      tests_require=[
          'mock',
      ],
      install_requires=[
          'luigi',
      ],
      entry_points={
          'console_scripts': [
              'luigi_tree = luigi_tree.cli:main',
          ],
      },
      zip_safe=False)
This will allow you to easily instal the luigi_tree package and run it from the command line. I find the easiest way to do this is to make use of virtual environments:
git clone https://github.com/dan-sf/luigi_tree.git
cd luigi_tree
virtualenv /PATH/TO/VENV/luigi_tree
source /PATH/TO/VENV/luigi_tree/bin/activate
pip install .
# Optionally run the luigi server (defaults to http://localhost:8082/static/visualiser/index.html)
luigid
# Run luigi_tree with default options
luigi_tree
The two main components of this package are the tasks and the cli located here:
luigi_tree/src/luigi_tree/cli.py
luigi_tree/src/luigi_tree/luigi_tasks.py
The tasks is where all of the dependencies and processing happens. First a root node of the tree is scheduled, then leaf nodes are continuously scheduled until it gets to the bottom level of the tree. I figured the Pascal’s triangle structure was also a good demonstration that multiple tasks can share dependancies. Luigi creates tasks based on the parameters that each task is scheduled with. So you can’t schedule the same task multiple times. This is why each of the node tasks have their own ID. This is a good safety measure preventing the user from scheduling multiple task that will do the same thing and write to the same output.
Luigi task output is also atomically created, so if you do experience a failure you won’t have a partially created data set. Either you get full task output or nothing even with long running tasks. This atomicity is a built in feature of Luigi. It is also necessary because each task only checks for output to exist in its requirements. For this reason, you would want your output to exist only after it has fully been processed. If that output does exist and requirements are satisfied, Luigi will stop scheduling lower dependencies and begin running the data pipeline from that point.
The CLI is set up as a setuptools entry point. This allows the user to run the Luigi Tree program by simply running on the command line, once it is installed. The CLI will parse the arguments and check to see if the Luigi scheduler is running. If the scheduler is not running Luigi Tree will submit the tasks using a local scheduler. You wont get any visualization using the local scheduler but Luigi will output logging that describes what is is doing as the tasks are scheduled and run.
If you have Luigi installed you can run the scheduler with the following command:
luigid
This will start the scheduler at the default address: http://localhost:8082/static/visualiser/index.html. If this is up and running luigi_tree will submit tasks there, allowing you to view the actual dependency tree:
You can also change the default behavior of luigi_tree with the following usage:
usage: luigi_tree [-h] [--level LEVEL] [--sleep SLEEP]
                  [--output-dir OUTPUT_DIR] [--server SERVER] [--port PORT]

optional arguments:
  -h, --help            show this help message and exit
  --level LEVEL         Set the number of levels the tree will have, default
                        is 2
  --sleep SLEEP         Set how many seconds each task will sleep for, default
                        is 2
  --output-dir OUTPUT_DIR
                        Directory path to write output targets to, default is
                        /tmp
  --server SERVER       Server the luigi scheduler is running on, default is
                        localhost. If there is no server running luigi_tree
                        will run using the local-scheduler
  --port PORT           Port the luigi scheduler is running on, default is
                        8082
Feel free to download and play around with the project over on github here. Hopefully this project can serve as a good starting point for anyone who is new to working with the Luigi framework. Let me know if you have any comments or questions below.